Take a screenshot on a Dell laptop keyboard is simple and useful for capturing what’s on your screen. Whether you want to save an image, document, or anything else, knowing how to take a screenshot can make things easier. In this guide, we’ll walk you through the steps to capture your screen using the keyboard on your Dell laptop.
Take a screenshot on a Dell laptop using the keyboard
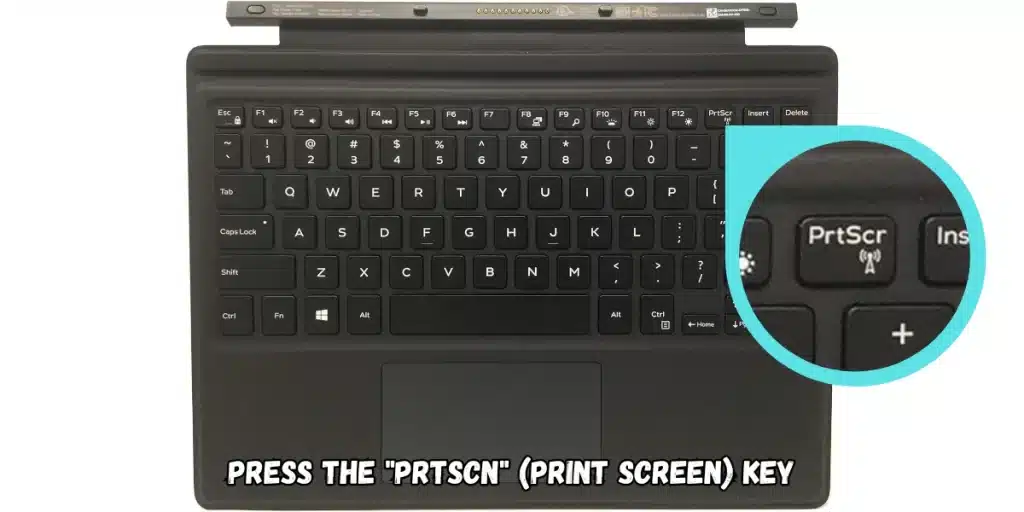
- Full Screen: Press the “PrtScn” (Print Screen) key. This captures the entire screen.
- Active Window: Press “Alt + PrtScn.” This captures only the active window.
- Save Screenshot: Open “Paint” or another program, press “Ctrl + V” to paste, then save the image.
These simple steps will help you capture and save screenshots on your Dell laptop.
Take a Screenshot on a Dell Laptop Keyboard
Taking screenshots is an essential skill that can make your life easier, whether you’re working, studying, or simply sharing something interesting from your screen. If you own a Dell laptop, you might be wondering how to quickly capture what’s on your screen using just your keyboard. This guide will walk you through various methods to take screenshots on a Dell laptop keyboard, ensuring you can easily capture images of your screen whenever you need.
Why Taking Screenshots is Useful
Screenshots allow you to capture exactly what you see on your screen. This can be particularly useful for:
- Saving Important Information: You might want to save a portion of a webpage, an error message, or important details from an online document.
- Sharing Content: Screenshots make it easy to share images of your screen with others, whether for work, study, or fun.
- Creating Guides and Tutorials: If you’re making instructions or teaching someone how to do something, screenshots help to illustrate your points.
Basic Screenshot Methods on Dell Laptops
Dell laptops, like most Windows laptops, come with several built-in options for taking screenshots. Below are the most common methods you can use.
1. Taking a Full-Screen Screenshot
The simplest way to take a screenshot of your entire screen is by using the “PrtScn” (Print Screen) key. Here’s how you do it:
- Step 1: Locate the “PrtScn” key on your keyboard. It is usually found in the top row, near the function keys (F1, F2, etc.).
- Step 2: Press the “PrtScn” key. This captures everything that is currently displayed on your screen.
- Step 3: Open an image editing program, like Microsoft Paint, by searching for it in the Start menu.
- Step 4: Once Paint is open, press “Ctrl + V” to paste the screenshot into the program.
- Step 5: Save the file by clicking “File” > “Save As,” choosing a location, and naming your file.
2. Capturing the Active Window
Sometimes, you only need to capture the active window (the window you are currently working in), rather than the entire screen. To do this:
- Step 1: Click on the window you want to capture to make sure it’s active.
- Step 2: Press “Alt + PrtScn.” This will take a screenshot of only the active window.
- Step 3: Open Microsoft Paint or any image editing tool.
- Step 4: Paste the screenshot by pressing “Ctrl + V.”
- Step 5: Save the image by going to “File” > “Save As,” and choose a location and name for your file.
3. Using the Snipping Tool
The Snipping Tool is a built-in application in Windows that allows you to capture specific areas of your screen. Here’s how to use it:
- Step 1: Search for “Snipping Tool” in the Start menu and open it.
- Step 2: Click on “New” to start a new snip.
- Step 3: Your screen will fade slightly, and you can now click and drag to select the area you want to capture.
- Step 4: Release the mouse to capture the selected area.
- Step 5: The screenshot will appear in the Snipping Tool window, where you can edit or save it by clicking “File” > “Save As.”
4. Using Windows + Shift + S (Snip & Sketch)
Another useful tool is the Snip & Sketch feature, which allows for more advanced screenshot options. Here’s how to use it:
- Step 1: Press “Windows + Shift + S” on your keyboard. This will darken the screen and bring up a small toolbar with options at the top.
- Step 2: Choose the type of snip you want: rectangular, freeform, window, or full-screen.
- Step 3: If you select the rectangular or freeform option, click and drag to select the area you want to capture.
- Step 4: The screenshot is automatically copied to your clipboard. A notification will also pop up in the lower-right corner; click on it to open the screenshot in Snip & Sketch.
- Step 5: You can edit the screenshot in Snip & Sketch and save it by clicking the save icon.
Advanced Screenshot Methods on Dell Laptops
For users who need more advanced screenshot options, Dell laptops running Windows offer some additional methods. These might be useful for those who frequently take screenshots or need more control over the process.
1. Taking Screenshots with Game Bar
The Game Bar is a feature in Windows 10 and later that is primarily designed for recording gameplay. However, it also has a screenshot function that can be used for any activity on your screen.
- Step 1: Press “Windows + G” to open the Game Bar.
- Step 2: In the Game Bar overlay, click on the camera icon to take a screenshot.
- Step 3: The screenshot will be saved automatically in the “Videos > Captures” folder in your user directory.
2. Using Third-Party Screenshot Tools
If you need more features than what the built-in Windows tools offer, you can use third-party screenshot applications. Some popular options include:
- Lightshot: A simple tool that allows you to quickly capture a selected area of your screen and offers easy annotation tools.
- Greenshot: A more advanced tool that allows you to capture screenshots, edit them, and even create full-screen captures with scrolling.
To use these tools:
- Step 1: Download and install the tool from its official website.
- Step 2: Follow the in-app instructions to take screenshots according to your needs.
- Step 3: Edit and save the screenshots as required.
Tips for Taking Better Screenshots
Now that you know how to take screenshots on your Dell laptop, here are some tips to make sure your screenshots are clear and useful:
- Ensure High-Resolution: Make sure your screen resolution is set to the highest available setting for crisp, clear screenshots.
- Clean Up Your Screen: Before taking a screenshot, close unnecessary windows and remove desktop clutter to focus on the content you want to capture.
- Use Annotations: Tools like Snip & Sketch or third-party apps allow you to annotate your screenshots. Use these features to highlight important parts or add explanations.
- Save in the Right Format: Save your screenshots in a format that suits your needs. PNG is great for high-quality images, while JPEG is better for smaller file sizes.

Common Troubleshooting for Screenshot Issues
Sometimes, things might not go as planned when taking a screenshot. Here are some common issues and how to resolve them:
1. PrtScn Key Not Working
If your “PrtScn” key doesn’t seem to work, try the following solutions:
- Check the Fn Key: On some Dell laptops, you might need to press the “Fn” key along with “PrtScn” to take a screenshot.
- Use Snip & Sketch: If the “PrtScn” key still doesn’t work, try using “Windows + Shift + S” to take a screenshot.
- Update Drivers: Ensure your keyboard drivers are up to date by checking for updates in the Device Manager.
2. Screenshots Not Saving
If your screenshots aren’t saving properly:
- Check the Save Location: Make sure you are saving the screenshot to a location that you have access to, such as your desktop or documents folder.
- Free Up Space: If your hard drive is full, your screenshots might not save. Free up some space by deleting unnecessary files.
3. Image Quality Issues
If your screenshots are blurry or of low quality:
- Adjust Resolution: Increase your screen resolution to the highest setting to improve the quality of your screenshots.
- Use PNG Format: Save your screenshots in PNG format for better image quality.
Conclusion
Taking screenshots on a Dell laptop keyboard is a straightforward process once you know the right steps. Whether you need to capture your entire screen, just the active window, or a specific area, Dell laptops offer multiple ways to get the job done. With the methods and tips provided in this guide, you’ll be able to capture, edit, and save screenshots with ease, making your tasks simpler and more efficient.